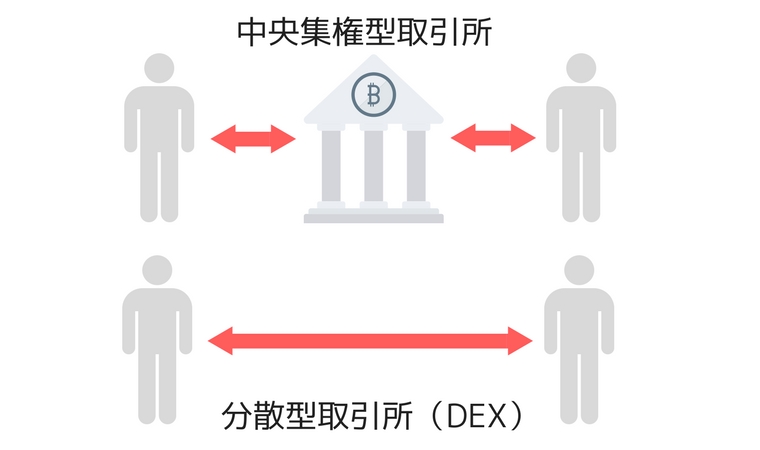
“Distributed Exchange (DEX)” that allows you to trade virtual currencies without a central administrator
Introducing the exchange “Singular X” that handles the large ICO “Centrality (CENNZ)”, which sold out on the same day for about 10 billion yen.
table of contents
- 1 What is a “Distributed Exchange (DEX)”?
- 2 Comparison of “Centralized Exchange” and “Decentralized Exchange (DEX)”
- 3 Decentralized Exchange (DEX) “Singular X”
- 4 Flow of purchasing virtual currency on the decentralized exchange (DEX) “Singular X”
- 5 How to register the decentralized exchange (DEX) “Singular X”
- 6 How to send money to the decentralized exchange (DEX) “Singular X”
- 7 Works with “Singular X” using the Ethereum wallet “Metamask”
- 8 Move Ethereum (ETH) to a trading account
- 9 Related articles
What is a “Distributed Exchange (DEX)”?
Difference between “Centralized Exchange” and “Decentralized Exchange (DEX)”
仮想通貨の売り買いするためには、「Coincheck」「bitFlyer」「Zaif」などの取引所で口座開設するのが一般的です。
いずれの取引所も管理する会社が存在します。
「分散型取引所 DEX(decentralized exchange)」とは、中央管理者がいなくても仮想通貨の取引が可能な取引所のこと。
メリット
- 不要な手数料がかからない
- 24時間365日動いている
- 本人確認が不要
- 秘密鍵を自ら管理できる
- ブロックチェーン上に取引所が存在しているため、ハッキングリスクが少ない
- カウンターパーティリスク(倒産)がない
デメリット
- 取引板が薄く流動性が低い
- サポートがない
- 日本語対応しているDEX無い
- 手数料が高い
- 流動性は低い
詳細記事:分散型取引所(DEX)とは? 比較一覧
「中央集権型取引所」と「分散型取引所(DEX)」比較
| 中央集権型取引所 | 分散型取引所(DEX) | |
|---|---|---|
| 資産管理者 | 取引所 | ユーザー |
| ハッキングリスク | ✕高 | ◯低 |
| 身分証明の必要 | 有 | 無 |
| 注文手数料 | ◯少 | △有 |
| 出来高 | ◯多 | △少 |
| 基軸通貨 | 法定通貨、BTC、その他 | DEXのプラットフォーム上の通貨 |
| サポート | あり | なし |
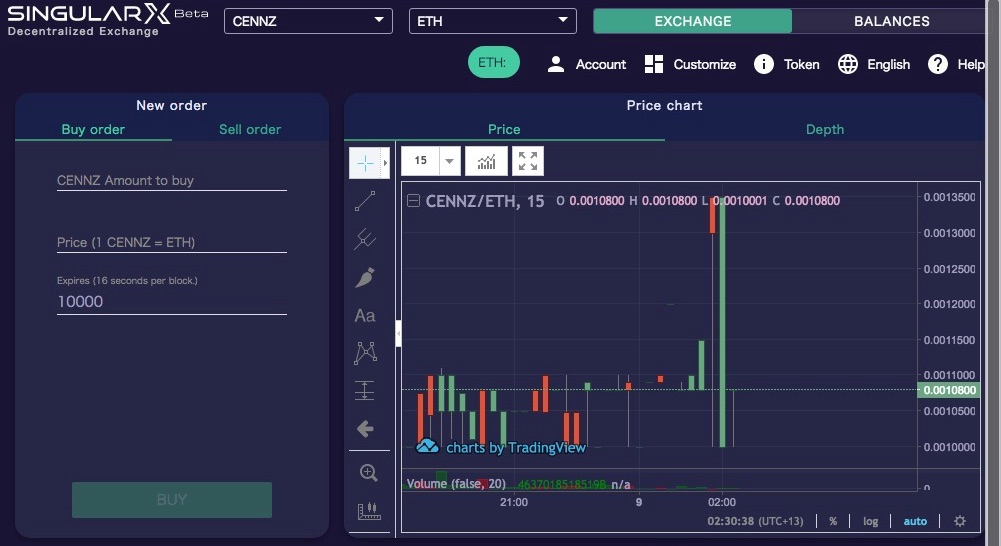
分散型取引所(DEX)「SingularX」
| 公式サイト | SingularX公式サイト |
分散型取引所(DEX)「SingularX」で仮想通貨を購入する流れ
- 分散型取引所(DEX)「SingularX」の登録
- イーサリアムをSingularXに送金(メタマスクを使う)
分散型取引所(DEX)「SingularX」の登録方法
分散型取引所(DEX)「SingularX」の登録方法は簡単です。
国内の中央集権型取引所のように本人確認書類の提出は不要です。
- SingularX公式サイトにアクセス
- ” Account Enter the” ” New Account and select”.
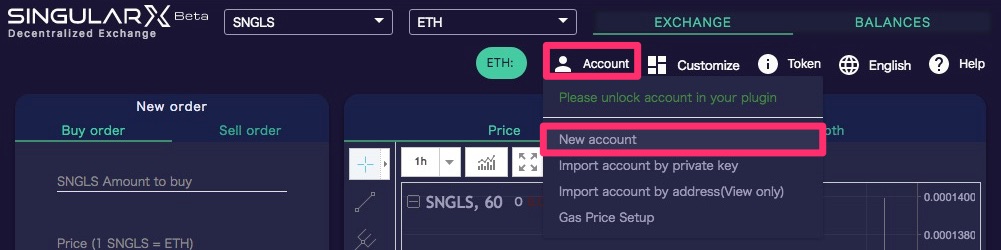

Enter “Account” and select “New Account”
- The “Deposit Address” and “Private Key” will be displayed.
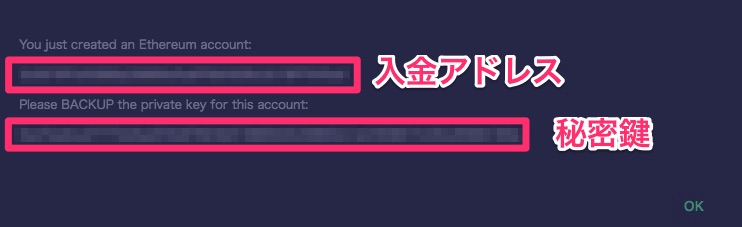
You just created an Ethereum account:
Ethereum deposit address
Please BACKUP the private key for this account:
Private key
Please keep the private key in a safe place so that it will never be known to others.
How to send money to the decentralized exchange (DEX) “Singular X”
- Confirmation of “Payment Address” of SingularX
- SingularX remittance from exchange or wallet
- Confirm payment with SingularX
Confirmation of “Payment Address” of SingularX
Click “Account” to display “Deposit Address” and copy it.
Transfer money from “exchange” or “wallet” to SingularX
Send SingularX’s “deposit address” from the “exchange” or “wallet” that owns Ethereum.
Confirm payment with SingularX
Confirm your deposit with SingularX.
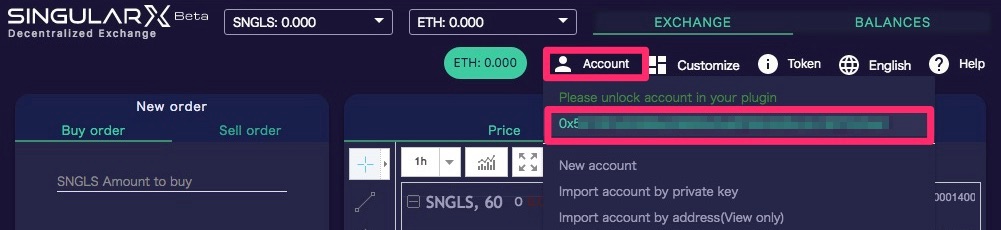
Works with “Singular X” using the Ethereum wallet “Metamask”
Import the Metamask address into SingularX. There are two methods.
Automatic import recommended by logging in to Metamask !
If you display SingularX while logged in to Metamask, the address of Metamask will be IMPORTed.
How to import manually
- Confirm private key (private key) with Metamask
- Import “private key” with SingularX
Confirm private key (private key) with Metamask
- Launch Metamask and select “…”> “Export Private Key”

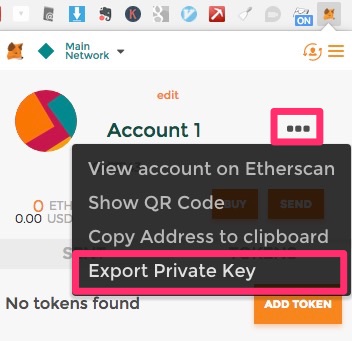
- Enter your password.
- Make a note of the displayed “private key”.
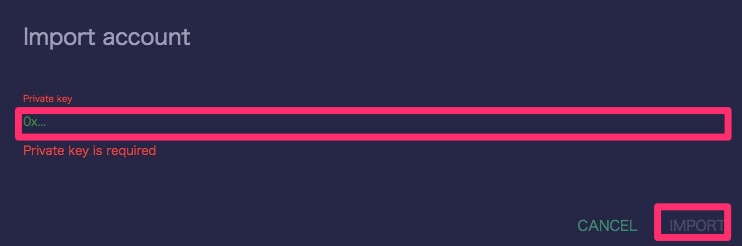
Import “private key” with SingularX
Click Account> Import account by private key.
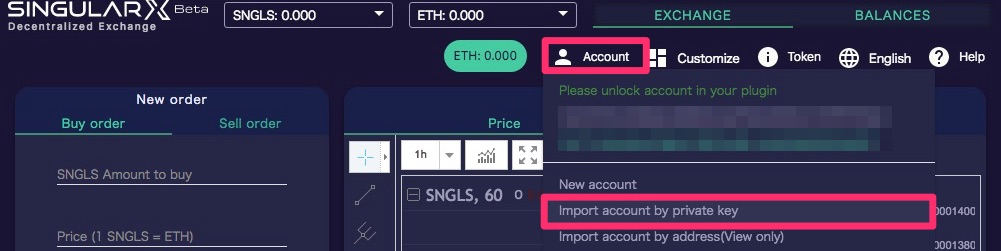
Enter the “Private Key” of Metamask and click “IMPORT”.
Import confirmation
Once imported, it will appear in “MetaMAx” in “Accout” of SingularX.

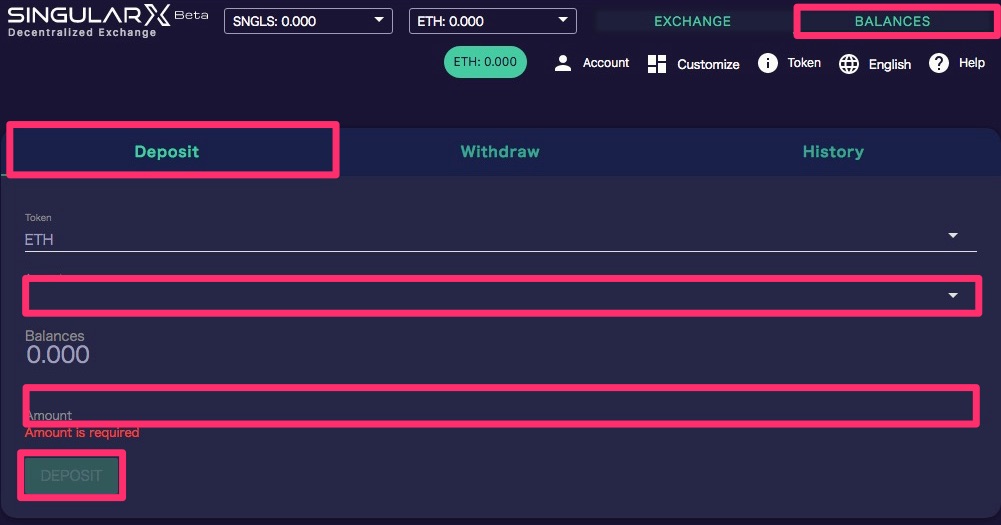
Move Ethereum (ETH) to a trading account
Move Ethereum (ETH) to your trading account.
Access the “balances” menu
Select the “balances” tab at the top.
- “Account”: Select a SingularX account from ▼ (pull-down menu)
- “Amount”: Enter the amount of ETH you want to deposit
Click “DEPOSIT” to complete the deposit.
Deposit history (HISTORY) confirmation
You can check the deposit history from the “HISTORY” tab.
Now you are ready to trade.